There's this idea floating around that you need tons of cash to own a camper. Well, for the next few minutes, I want you to imagine a different type of mobile habitat, the kind that's towed behind a bicycle and not your average SUV or truck.
That's right, folks; I've run across step-by-step instructions on building your own one-person camper. Best of all, with some basic welding experience and a weekend or so, you too can join the glamping game. Sure, this time around, you and your friends will all be taking bike-packing trips, but that doesn't mean the design isn't worth it.
The video I ran across was posted on the YouTube channel Drew Builds Stuff. While it doesn't seem like we've showcased Drew's work before, his channel is filled with fantastic projects you'll see in the future. Still, this particular video should give you a clear idea of what to expect from this backyard engineer (there's no information regarding Drew's background).
Now, the design is rather rudimentary, but try and remember that it was built in a garage with nothing more than a hammer, some screws, steel, wood, and, you guessed it, glue, quite a bit, really, but that's the fun of building your own RV. Time to see how you can keep yourself busy this summer.
Photo: Drew Builds Stuff / YouTube Screenshot
In the video posted below, Drew, the channel's host, starts off with nothing more than some square steel bars, which are then cut, sanded, and bent into the desired shape. The only issue seemed to be the tow bar. Remember, it's to be attached to a bike's dropouts; some tweaking will be necessary. With all the essentials ready, it's time to start welding this sucker into its final shape. With axles and stabilizer legs in place, the frame is set, and it's time to move on to the shell.
While watching Drew draw up the plans for the shell, I couldn't help but notice a striking resemblance to another RV style I cover quite often, the teardrop. Heck, I've even written about a DIY teardrop camper before, and the steps necessary are quite similar, including a framework with roof and walls, insulation, and even some elementary electrical wiring. Come to think of it, you can say you're building a proprietary teardrop camper, albeit a very rudimentary one. Clearly, there's no galley; only open skies and firepits.
As the video continues, we see Drew completing the shell from nothing more than plywood and 0.5-inch (1.27-centimeter) insulation. With walls and lateral struts in place, this highly downsized habitat is already starting to take shape. All that's left now is the insulation for the roof and walls, some sanding to make everything nice and "flush," while a layer of drywall spackle readies the camper for a layer of "poor man's fiberglass."
Photo: Drew Builds Stuff / YouTube Screenshot
What's poor man's fiberglass? It's basically a method that involves the application of painting canvas cloth to the exterior of the camper. With a thin layer of Titebond wood glue, the fabric is set and stretched over the shell. To smoothen out the surface and help the cloth stick, Drew goes to town ironing everything as if it's prom night all over again. Trim the excess, seal the overlapping edges, and then it's on to painting. That's it!
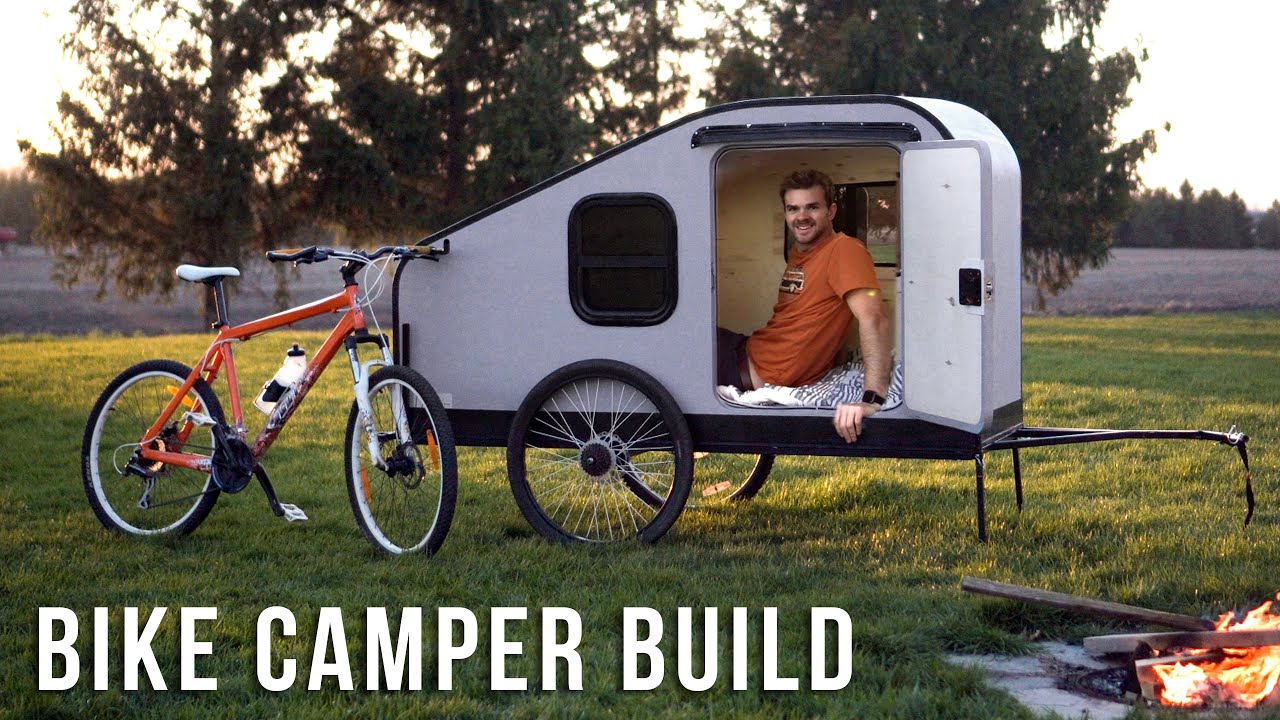
Sure, for this stage, Drew points out that you'll want to add multiple coats of paint as this material is often the first protective layer against the elements, much like your own skin. With doors, windows, and the wheels completing the unit, your off-grid habitat is ready. Secure it to the steel frame, hook it up to your bike, and off you go. Happy glamping!
If you are looking for a project to keep yourself and/or the kids busy for a weekend or two, you'll need $1,200 (€1,140 at current exchange rates), Drew's budget, and the steps portrayed in this video. Once you're finished, you can rock-paper-scissors for who gets to take it out for its first spin. Better yet, make a few for the whole family and explore nearby lands like never before. In time, I'm sure you'll find ways to build upon and improve your personal RV.
A bit of a nomad at heart (being born in Europe and raised in several places in the USA), Cristian is enamored with travel trailers, campers and bikes. He also tests and writes about urban means of transportation like scooters, mopeds and e-bikes (when he's not busy hosting our video stories and guides). Full profile
Would you like AUTOEVOLUTION to send you notifications?


")


")