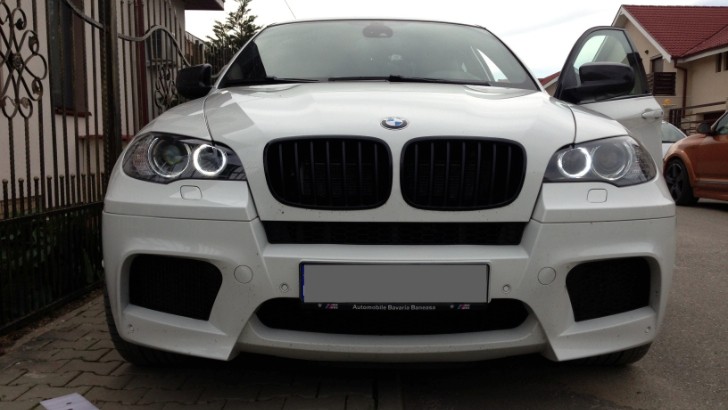
Angel Eyes became a BMW trademark almost instantly after they were released and everyone loves them. However, after a while you might get a bit bored of the same look for the front end of your car.
That's where the Adjustable Angel Eyes kit we showed you last week comes in. It's a simple LED lamp that changes the hue of your corona rings in small baby steps so that you get a different shade every day.
Looking at this fine product, we decided to buy it ourselves and test it out on one of our redaction's cars to see how much it changes the look of a BMW. Of course, being the BMW enthusiasts that we are, we had to do everything ourselves so we put together a short DIY to show you how to do it too.
Step 2: Pop the hood and locate the dust cover of the headlight then remove it by twisting it counterclockwise. (Photos no. 1 and 2)
Step 3: Locate and remove the old bulbs by twisting them counterclockwise. Notice that the connector is oriented upwards (Photo no. 3)
Step 4: Once the bulb is out, disconnect the wire harness by releasing the 2 tabs on the outside of the bulb using a small flat head screwdriver (Photo no. 4)
Step 5: Set the desired color for your Corona Rings (the 5700k one is closest to the OEM version, going further towards 12,000k making them look whiter) using the coding present on the controller.
Step 6: Plug in the LUX H8 bulb and switch the ignition on. They should be working about now so you can check out the color and adjust it some more before putting everything back together. (Photos number 5 and 6)
Step 7: After checking everything works and the color matches your preferences, go back and unplug the H8 bulb, insert the control panel inside the headlamp and then replug the bulb, making sure the flat side of the aluminum radiator is facing upwards. This will help you with the next step. (Photo number 7)
Step 8: Close the headlight by reattaching the dust covers and rotating them clockwise.
This is a DIY guide and, as such, you must be aware the procedures described here involve some risks. autoevolution cannot be held responsible for any possible damage that might result while following this guide.
Looking at this fine product, we decided to buy it ourselves and test it out on one of our redaction's cars to see how much it changes the look of a BMW. Of course, being the BMW enthusiasts that we are, we had to do everything ourselves so we put together a short DIY to show you how to do it too.
So, let's begin:
Step 1: Get your stuff together. Once you have the LUX H8 kit by your side, you should be looking at 2 lamps for the Corona Rings (each has a small control panel attached to it, to allow you to change the color of your rings), one for each headlight.Step 2: Pop the hood and locate the dust cover of the headlight then remove it by twisting it counterclockwise. (Photos no. 1 and 2)
Step 3: Locate and remove the old bulbs by twisting them counterclockwise. Notice that the connector is oriented upwards (Photo no. 3)
Step 4: Once the bulb is out, disconnect the wire harness by releasing the 2 tabs on the outside of the bulb using a small flat head screwdriver (Photo no. 4)
Step 5: Set the desired color for your Corona Rings (the 5700k one is closest to the OEM version, going further towards 12,000k making them look whiter) using the coding present on the controller.
Step 6: Plug in the LUX H8 bulb and switch the ignition on. They should be working about now so you can check out the color and adjust it some more before putting everything back together. (Photos number 5 and 6)
Step 7: After checking everything works and the color matches your preferences, go back and unplug the H8 bulb, insert the control panel inside the headlamp and then replug the bulb, making sure the flat side of the aluminum radiator is facing upwards. This will help you with the next step. (Photo number 7)
Step 8: Close the headlight by reattaching the dust covers and rotating them clockwise.
You're done.
We even attached a couple of extra photos to show you the exact difference between OEM Corona Rings and the LUX H8 aftermarket ones. Good luck! (Photo number 8 has 1 LED Bulb and one Halogen, OEM one and Photo number 9 has both LED Corona Rings on).This is a DIY guide and, as such, you must be aware the procedures described here involve some risks. autoevolution cannot be held responsible for any possible damage that might result while following this guide.


